2012/06/30

Building the Side Structures

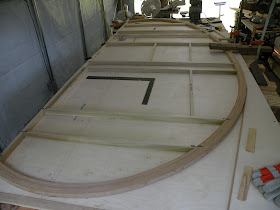
To review, the structure of the sides is a rib, shoe and other members sandwiched between two 1/4" sheets of Baltic Birch.  With the ribs laminated and dressed, we proceeded to construct the right side structure, followed by the left side.

The following sequence details the steps to cut and fit the parts for the left side.

First, we set the inner plywood sheets with the bottom to the right, then, after transferring critical measurements, the main left ribs.

The next step was to fit the shoe, or bottom part of the side that will sit on and attach to the floor.

Once the shoe was fit we could proceed to fit the vertical parts and the door and window horizontal pieces.

The above view shows the verticals in place for the door and window, plus one forward of the door.  The door sill and header are also visible if not perfectly positioned.
 
Here the main partition (right) framing is shown.  On the inside of the trailer the width of the vertical is expanded to allow for attachment of the partition via a wing attached to the partition plywood.  Another piece is added to fill out the thickness of the rib and allow for support/attachment of the outer plywood skin.  Likewise, another assembly is positioned (left) to provide for attachment of shelving inside the galley.

Here the entire left side is cut and fit (but not attached):

  
 Finally, here is the entire right side structure fully attached.  There are jigs at the top to connect the two rib sections and retain the proper relationships.

The ribs have yet to be trimmed at the bottom edges.  The door is in the large opening to the right, and the window in the rectangular opening to the left of the door.

Tomorrow we will glue/nail/screw the left side together.  After that, the next step is to adhere the plywood inner skins to the side structures, then trim the plywood to the ribs.

2012/06/29

Photographer Error

Due to a photographer error, the pictures I thought I took of the freestanding right side structure didn't materialize because there was no memory card in my camera. 

Sigh.  Take this bit of advice:  don't grow old.  Things happen when you do.

I'll post pictures tomorrow.  Meanwhile, we put down the left side plywood, laid out the critical lines, and placed the right side structure to transfer the balance of the lines.

Then, it was hot.  Hot.  Humid.  Summer.

We retired.  For the day ...
 

2012/06/27

Visual Progress

Visual Progress at Last!


 If yesterday was a milestone, today was the visualization of the milestone.  We created most of the structure for the right side wall.


This view is from the front.  The framing square is in the opening for the door.  The window opening is just behind, aligned with the top of the door opening.

The view from the rear:


A few pieces remain to be added to this structural layout, such as some horizontals in the galley area and a filler below the door sill.  Once those are cut, the next steps are:

  1. Fully connect (using glue, nails and screws) the right side structure
  2. Lift the structure and place the plywood panels for the interior left side
  3. Place the right side structure, flipped, onto the left side interior plywood panels
  4. Mark the critical points on the left side interior plywood
  5. Remove all from the table
  6. Place the right side structure onto the table and cover with the right side interior plywood
  7. Adhere and nail the right side interior plywood to the right side structure
  8. Trim the right side interior plywood to the structure
  9. Flip the right assembly and install the right side interior rib
  10. Remove the right side assembly
  11. Affix the left side interior plywood, with critical points, to the table
  12. Create the left side structure
  13. Fully connect the left side structure
  14. Remove all from the table, place the left side structure onto the table, cover with the left side interior plywood, adhere and nail
  15. Trim the left side interior plywood to the structure
  16. Flip the left side assembly and install the left side interior rib
  17. Build the platform on the trailer base
  18. Set the walls with critical cross-members
  19. Install the partition between the cabin and galley
  20. Install critical galley members
  21. Install the interior ribs and install cross-members
  22. Skin the interior of the cabin
  23. Install cabin shelving and cabinetry
  24. Install electrical conduits and wires
  25. Cut and fit insulation
  26. Skin the exterior walls with 1/4" Baltic Birch
  27. Skin the front/top exterior with two layers of 1/8" Baltic Birch
  28. Build and fit the hatch
  29. Detail the galley
  30. Skin the entire exterior in painted aluminum
  31. Install aluminum trim pieces
  32. Install the doors and windows
  33. Install drip details over doors and windows
  34. Install full extension platform for cooler
  35. Sand and finish
  36. Install user lights and outlets, install exterior clearance lights
  37. Install sink, tank and pump
  38. Test pluming and electrical
  39. Fix any issues
  40. Celebrate
  41. Go camping
Hey, we're almost there!  Har!

2012/06/26

The Trailer Depot


At this point I should mention that I purchased my Aluma trailer at The Trailer Depot in Northford, CT.  Bobby Fantarella was most helpful, patient and understanding in the process of my coming to a conclusion as to the proper platform.  They sell a broad line of trailers, and have very competent parts and service departments to boot.

Builders have three basic choices:

  • Purchase a "bolt-together" trailer from Harbor Freight or Northern Tool, for example
  • Build a custom-welded trailer from scratch
  • Purchase a "platform" trailer, such as the Aluma 6310H that I bought.
The issues with "bolt-together" or custom-welded trailers are the ability to stand up to long-term corrosion, the need to get a VIN to register the trailer, the elements required for DOT compliance, and the need to seal the floor bottom against moisture.

My trailer met all of those issues at purchase:  the all-aluminum construction avoids the corrosion issues; the solid bed avoids the sealing against moisture problem; and, it had a VIN and was DOT-certified at delivery.

I must note, though, that the other two options are less costly, naturally.  Still, I felt the added investment was worthwhile considering the issues I avoided.


Notice 6/26/2012:

http://www.emmittsteardropadventures.net may now be used to access this blog.  (It may take a day or two for the redirect to propagate throughout the internet ....)


The Ribs are Split and Trimmed

Today, Sean, Norman and I trimmed the 8-ply ribs to thickness and split the 6-ply ribs.  (We laid up 6-ply ribs 1-1/2" thick and split them to get 3/4" thick 6-ply ribs.)

Here's a view of the setup for trimming:


The circular saw is clamped to the side of the table using 2x4s and lag bolts.  There is a small platform just below the saw with a shim to set the height of the blade above the table.  This is Sean's design and execution, and it worked very well.  The alternative was to attempt the work on a table saw, and there's little doubt it would have been far less successful.

During the trimming operation one of us was positioned on either side of the saw, guiding the rib past it, while the third person was "steering" the rib end and helping keep the rib against the saw base.

First we set the saw (as you see above) to cut slightly less than 3/4" and ran each of the 6-ply ribs past the saw twice with the face we had previously planed smooth against the table.  Then we reset the saw to cut 1-1/2" and ran each of the 8-ply ribs past the saw once.

Here is a view of the finished products, with the front ribs on the right and the rear ribs on the left:


Today was a milestone.  Now we can begin assembling the first side's structural elements.  The layout is already drawn on the 1/4" Baltic Birch.  Tomorrow we will rip the poplar boards to 3/4" x 1-1/2" and begin the process.
 

2012/06/21

Update 6-21

The heat here in Connecticut is brutal (for us, anyway) and has caused a temporary halt in our progress.  Yesterday we attempted to work, but after a couple minutes had to sit back down again.
The next step is to get the ribs dressed to size.  We're working on just how to best accomplish this.

Stay tuned!

2012/06/19

Right Side Layout

Today the layout of the right side of the cabin continued.  Below you can see the relationship between the floor, the door and the window.


The front of the trailer is in the foreground of the photo.  Both openings will be centered around the vertical line that represents the juncture of the two ellipsis.  The tops will be horizontally aligned.

The photo below shows some of the layout of the main galley partition and the divisions on either side.


Our next steps are to size the ribs and add the appropriate pieces to the side layout.

2012/06/18

A New Table

Having completed the laminations, we knew we needed a flat surface on which the trailer sides would be laid out. But we wanted to retain the gluing stations for the laminations, should they be needed later.

We decided to put a layer of 1/2" plywood on top of the existing stations.  The first step was to add 2x4s at appropriate locations to support the new table layer:


With the added support  in place we laid 1/2" plywood on top.


With the new plywood in place, we located the trailer right side 1/4" birch and started laying out the critical points:


Several key points have already been located with the assumption that the trailer's right inner side is on the top side of this surface.  Tomorrow we will continue to locate critical points and then place laminated rib sections, locate the door and window, and create the side's structural members. 

2012/06/16

Baby Backs

All the ribs being complete, today we set about planing one side of each flat.  The premise is that we will set up the table saw and run the flat side against the fence to trim the other side, then set the fence to the desired width, flip the rib and trim the first side.  The inner, 6-ply ribs will be then split to form a pair of 3/4" ribs from each.


It's going to be great to see the exposed portions when they receive a finish.

The next step is to create a jig for the table saw to assist in the process detailed above.

2012/06/14

The Ribs are Complete!

Thanks to Norm Brody for assisting today in laminating the last of the half ribs.

Here is a shot of the full rib in approximate position (that's Sean holding the rib; you can see Norm's right arm at the right of the photo, he having narrowly escaped the shot):


Here is a view of the last 8-ply rib section that we layed up today:


Since we decided to create half-ribs rather than attempt to lay up full ribs, there is a point where the half-ribs meet.  Here is a drawing detail of the junctures:

Front is to the right.  The left partition is floor-to-ceiling and separates the cabin from the galley.  The rightmost partition is shown only partially; it will be wall-to-wall but only 24" high and will create cabinet space inside the cabin.  In both cases the plywood partition will be backed on both sides by oak solids.  The oak boards on both forward sides of the partitions, and the aft side of the forward partition, will be in essence "yokes" - notched to receive the ribs.  The aft side of the aft partition will become the hatch hinge mounting point.

"But,"  you ask, "why do you have two junctures?"  Simple:  the lengths of the oak slats as provided couldn't support the front section running all the way to the main plywood partition while simultaneously having one-piece plies.  We had realized during our test lamination (the one full rib) that having a joint in a ply was to be avoided.  In order to run to the aft partition above we would have needed many more slats over ten feet long.  Consequently, the cabinet partial partition became the main juncture.  This also means that the interior aft ribs will be cut into hatch pieces and stationary pieces running between the two partitions.


Structure - An Ongoing Conversation


As I mentioned recently, the design of the lattice - the ribs and the cross pieces (I called them stringers, in roof structure terminology they are purlins) and how to join them is an ongoing conversation.  Today, Norm Brody offered yet another solution that has promise.

The detail would be to create two half-thickness purlins with groves down their middle - essentially a 3/8" x 1-1/2" piece with a 1/4" wide by 1/8" deep groove, all by 5' length.  These halves would be glued together, creating a member 3/4" x 1-1/2" with a 1/4" square hole through it.  They would then be cut to length to fit between the ribs, and corresponding holes drilled through the ribs.  For assembly, we would take a long enough threaded rod and insert it through the first rib, through the fabricated purlin, through the next rib, through the next purlin, etc., and use bolts and washers on both ends to draw the assembly tight.  The holes on the outside would be counter-bored to accommodate the diameter of the washer and the depth of the washer and nut.  The rods would be cut to length so as to be buried inside the structure and not visible once the side panels are added.

This technique has promise, but since we aren't ready to do this tomorrow, anything can change.  First we need to clean up the ribs and split the center ones (built up 1-5/8" thick but each individual rib is to be 3/4" thick) and lay out the sides.  With the side layouts in place we can then lay out the cross-members.  So, other ideas may present themselves in the meantime.   

2012/06/13

Another Status Update

The two 6-ply rear rib sections are complete, leaving only the 8-ply rear rib section to make.  Plan is to lay it up tomorrow, 6/14, weather permitting.  In celebration, I'm grilling a rack of baby back ribs tonight.  Yummm!

Sean and I have had much discussion on the technique for building the rib/stringer lattice.  I love the way that this project/design evolves even as we work.  It is an interactive design process with a lot of debate and idea exchange.

It reminds me of the technique that 12th century architects used to build cathedrals.  In that case, it took so long to build a "floor" that the original architect was usually long dead before the project was complete.  The builders would erect a "floor" and the design of what went on top if it might change based upon the experience of the section below - an interactive process of design and construction experience.

Thankfully, this project is a) not a cathedral and b) not on such a long time scale.

Although, it may not be complete in time for any camping this summer.  

Oh, well.  It's all good!

Stay tuned!

2012/06/08

Status Update

All of the front rib sections are complete, leaving three rear rib sections yet to go!

As is usually the case, by the time we're done we'll know how to do it. 

Link to Another Teardrop Project


Gary Dierking left a comment linking to his blog concerning his own teardrop project.  Gary is in New Zealand.


2012/06/06

Nota Bene

Comments have been enabled and are welcomed.

June 6 - We Have (Some Partial) Ribs!

The test rib is complete, and the material to make the production ribs is on hand.  We ordered the 1/4" x 1-5/8" white oak strips from Connecticut River Lumber in Old Saybrook, CT.

Connecticut River Lumber is a specialty wood supplier carrying solids and plywoods in many species such as white and red oak, walnut, birch, maple, cherry, sapele, various cedar varieties, pine, teak, etc.  They have slabs, boules and burls available, mostly locally sourced.  For instance, I recall seeing some walnut boards that had to be 10/4 thick by 24"  wide in 12' lengths.  These boards made me lust for a project to use them!

N.B. "Boules" are whole logs that have typically been sawn into 8/4 thick slabs.  "Burls" are sections of a tree that grow in a bulbous form, often to a couple of feet in diameter.  Burls are often used to turn bowls, but make very interesting boards with mottled grain when sawn flat.

They also have a selection of "reclaimed" lumber, and a "short sale" on sapele and some African Mahogany.  Shorts are the ends of boards cut off by the mill.  Some of their shorts are, as I recall, up to 12/4, widths usually 10-12" and lengths up to 4'.  I'm still trying to figure out how to work some of this into the teardrop ... Every time I go there I just stare and and fondle this pile of wood, wanting desperately to leave with some of it.

John Stangel is the proprietor, and I can't say that I've ever met a more personable, accommodating and responsive supplier of any material.  If you are anywhere near this location and have a need for exotic woods or plywoods, please stop in and tell him Emmitt sent you.  You won't be disappointed.

The Ribs


Our learnings from the test rib suggested that we should build the production ribs in two sections - front (the longer) and rear - and that all plys be one piece.  The length of the two sections was a balancing act between the available stock, the curves themselves, and the desired location of the partition between the cabin and galley, since this could be used as a point to join the rib sections.  Once this was understood, we examined the strips supplied and determined that a panel which will be positioned in front of the partition separating cabin from galley, and which will create some storage space, would serve as the meeting place of the two sections.  We also determined that an additional piece of white oak long enough for the front section was required, and that we needed to saw 6 additional strips.

As part of this equation we further determined that the test rib would be used in production.  Had we not done this, we would have needed an additional 8 strips for the longest (front) section.

To review:  The outer ribs are 8-ply while the inner ribs are 6-ply.  The inner rib sections will be layed up as 1-1/2" wide and split into two 3/4" rib sections.

Three days ago Sean and I, with the assistance of his son Garrett, layed up the one required 8-ply front rib, and yesterday, with the help of Norm Brody, another long-standing friend and associate, the first of two 6-ply front ribs.  We have one 6-ply front, one 8-ply rear and two 6-ply rear assemblies to complete.


At this point we have been dancing with the weather.  Since the glue spreading is being done outdoors, we have to dodge the rain showers and thunderstorms that have plagued us recently.